Quantcast
Channel: David Revoy
Viewing all 525 articles
Browse latest View live

Krita video presentation, Capitole du Libre 2012 (FR)

$
0
0


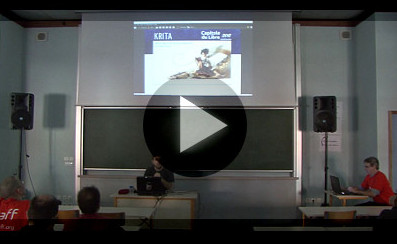
If you missed it , link to the record of my 45min Krita presentation in French
done for the event 'Capitole du Libre' in Nov. 2012. Thanks Toulibre.org for hosting.

All four seasons

$
0
0


(click to enlarge)

" That's my baby
She can be all four seasons in one day "

-- Sting , 'All four seasons" , Album " Mercury falling" 1996

Painted with Krita
Creative Commons License

This work is licensed under a Creative Commons Attribution-NonCommercial-NoDerivs 3.0 Unported License.
Reposting and usage of the artwork is free, allowed and encouraged, providing credits "Artwork : www.davidrevoy.com"  but any usage of the artwork for commercial purposes or manipulations, derivations are strictly prohibited.

Contest : Revamp Konqui KDE's mascot

$
0
0


Konqui the friendly dragon , by Stefan Spatz , has been KDE's mascot for over ten years now. Being the mascot of one of the major desktop environment for Linux is a hard task, and after rapid search for image, you can see above Konqui have fans and has been around for a while.  ( Image credit:: topleft: Linux user .de  2002, topright: Planet KDE Portugal , bottom-left : Kubuntu user contribution wallpaper, bottom-right : the 'about' dialog of every actual KDEs with Konqui )


But the design of Konqui (or Konqi as named on Wikipedia )  need to be refreshed , so,  KDE forum admin Neverendingo is organizing a fun contest together with Krita community ! There two prizes: a DVD+Comics pack and the last original First Krita Sprint t-shirt! And of course undying fame!

The jury consists of Animtim, Nuno Pinheiro and myself.

So fire up Krita and get painting!

There are some ground rules::

  • Needs to be done in Krita
  • The artwork should be licensed under the LGPL V2+.
  • It should honor KDE's Code of Conduct, which means, for instance, that Konqui shouldn't be beating a garden gnome with a big hammer.
What is needed is a versatile portrait without background that is usable when preparing publicity for KDE and that inspires people. When you're done, go over to the Krita contests forum and add your submission: one topic per submission, but feel free to update your work with a followup post. The last one at the deadline counts.

The contest starts now and you have until January 31st, so you have the whole holiday season to paint!

Artscript v1

$
0
0

 Artscript , KDE services


I'm a not a developper, but I started to play with 'bash' script on my freetime, and I just want today to share my  humble scripts packed.  Yes, I'm proud of my first 'release' , and you can probably feel it in this little video above.  My goal : bring to artist users a series of handy KDE's services script, for boosting productivity task. I made them for my freelance usage along the time.  The video show the features and usage, I hope you'll like them.

Details of scripts in the package :

Note : input files compatible : *.xcf , *.ora , *.kra, *.psd , *.tiff, *.png , *.jpg , etc...

ToWeb :
    export selected files to jpg, with customisable compression, size, watermark
    --> for exporting preview for your client, or final resized piece for your post on web, emails, etc...

ToOra :
    Convert selected files to open-raster layered file format, as opened by Krita, and saved as *.ora
    --> for converting old *.psd or *.xcf project you want to retouch with Krita or Gimp.

ToPng :
    Convert selected files to flat png, compressed well.
    --> Ideal for lossless flat archiving, or transmit flat RGB Hi-res

Date :
    Add the prefix date with the ISO pattern : YYYY-MM-DD_yourfile.ext , work on folder, multiple files, etc...
    --> Ideal to keep your folder and artwork version , sorted by filename = sorted by creation time.

Collage :

    Do a collage of the selected files into a unique jpg image at 92% compression, tiling customisable
    --> Ideal to compare 2 artworks, export a Work in Progress.


Dependencies :

kdialog : for the GUI windows
xcftools: for the XCF reading compatibility
calligraconverter: for the KRA, ORA compatibility
imagemagick : The main library for the rest, and manipulations ( resizing, collage )

on Kubuntu :
sudo apt-get install xcftools krita imagemagick-common

Download :

2012-12-18_artscript-v1.tar.gz  ( 60KB )

Disclaimer :
Use them it at your own risk.

How to install :

  • tested on Kubuntu 12.04 and Linux Mint KDE 13 :
  • Download and Extract the artscript-v1.tar.gz
  • Copy the share folder into your ~/.kde folder
  • Go to the folder ~/.kde/share/kde4/services/ServiceMenus/artscript
  • And check if all the script are exectuable ( right click, permission tab, is exetable )
  • Note: Edit with a text editor ( Kate ) 'toweb' , you can customise the watermark preset, and suffix on the script, l.80 and l.138
  • Done

Future :

You enjoy ? you want to developp it ? continue it ? adapt it for Nautilus script, Nemo script , or Thunar Action, or wathever DE ?
Fine ! here I'm a bit limited by my poor skill, so it's up to you if you know how to put it on GIT, bring features, make better default , etc... I'll be happy to test, and be around.

Licence :

  www.davidrevoy.com , info@davidrevoy.com  GPL 3.0
  some of the icons are derivative of the Tango icon project
  and Faenza under compatible license. 

Askaryl's Grimoire project

$
0
0

Sample of 3 speedpainting done for BlueFlame Publishing Askaryl's Grimoire project ,
the application contain more than 35 ones to illustrate your game-book journey.


Sample of ennemies and creatures mini portrait, I painted around
100 portraits of them.  On the final application a heavy compositing is set on the top to
reach a dark and sepia effect.


Storyboard sample of the video teasing intro , not in a timeline order.
More storyboarding works was produced by Delapost Paris in a second time.

About the production :


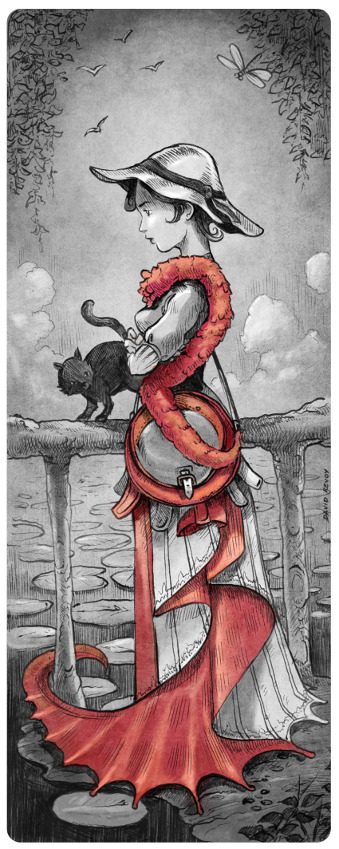
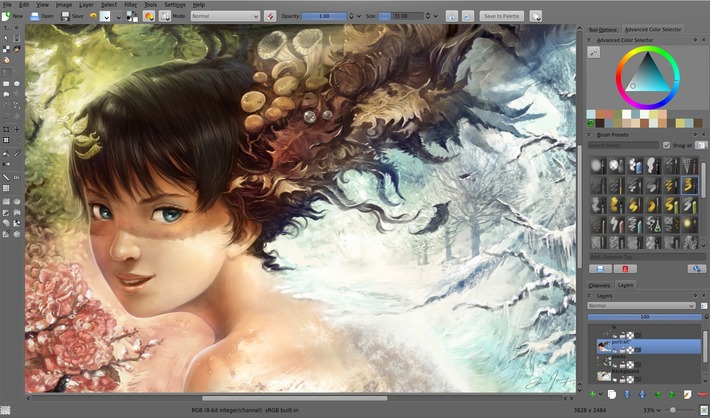
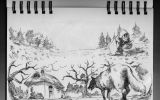
Here are samples of the work I did for BlueFlame Publishing on the project "Hamnasya -  Askaryl's Grimoire"  , a role playing gamebook released on the App Store for iPhone and Ipad on December 15th.  ( exist in English and French version )

I'm happy to had been part of this production,  the team is brillant and full of ideas. It was also a deep kid's dream for me to work on a gamebook ( wikipedia link , if you don't know what is a gamebook ).  I read so much of them on paper back in the 80s/90s , switching page into a maze of page numbers. The visual theme of the quest is clearly around a classic dark fantasy, with creatures , fighting , magical powers, items and  big landscapes. 


If you want to have a good time reading an interactive book with epic background music, fully illustrated and fighting rolling virtual dice ; this one is for you !  .. well, if you own an Ipad or a IPhone. Here as an open-source contributor and advocate, I prefer to eat my socks than buying a Apple product buy an Android devices.

My job on the production period was done between summer 2011 and till January 2012, a bit before starting working on "Tears of Steel" open movie. 

All illustrations were done using Krita development ( between 2.3 and 2.4 ) with a bit of post prod in Gimp. Thanks for the many lighting debug from the Krita team at this moment !
I worked threw a *.ora pipeline and the export for BlueFlame Publishing were hi-res PNG sRGB 8bit.

Here is a little bonus to see the making of one of the 35 speedpainting :


Here is the cinematic trailer done to tease the app , produced by Delapost Paris :


PS : Thanks again BlueFlame publishing for permit me to post a wide range of visual of the project on my blog !

For more information: http://www.hamnasya.net 

2013

$
0
0

"2013"
ball-pen, digital colors with Krita

I wish you to all a happy and creative new year 2013.
Last year ended here after a big week of holiday where I spent all my time away from my studio and my computers.
I took a lot of pleasure with friends and family, and also doodling on my free time with a black ball-pen on my A5 sketchbook.


Palettes for Gimp , Mypaint or Krita

$
0
0
palettes distribution illustration

Note : This page is an update ( old version : 25 december 2009 ).
* License changed from CC-By to CC-0 ( Public Domain )
* General update of the page and files

Download :

Download the compressed 2 *.gpl files  : davidrevoy-palettes-v2.tar.gz ( 10KB )

Install :

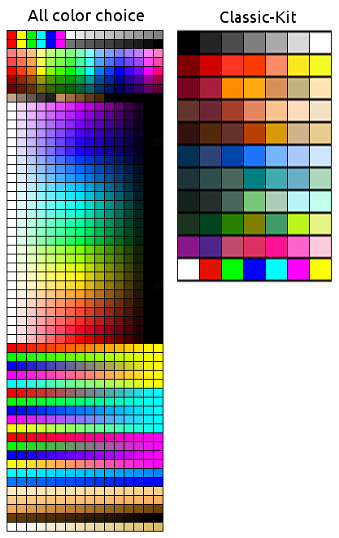
Extract the archive, the two *.gpl files are compatible with Gimp , Mypaint post 1.1 and Krita

Infos :

Classic kit  ( by default in Mypaint 1.1 ) : The aim of this kit is to mimic color range met in traditionnal art ( exept for the last raw  : digital RGB + CMYK pure colors.

     All color kit  ( by default in Mypaint 1.1, Krita, GPS ) : The "All color kit" is a kit for having a wide range of colors. The kit mimic on the top  a traditionnal Photoshop palette ; some user are really used too, it's became a classic. On bottom there is large gradients from white colored passing at middle to the pure color and finishing to the black colored tone, large gradient from a pure color to another one ( ex ; pure digital red / to yellow ), at the end various skin tones.

      License :

      The distribution and the files are under the CC-0 , public domain

      Mypaint 1.1 ; A guide through the new features

      $
      0
      0

      At the very end of 2012, the code of the famous free and open-source digital-painting program Mypaint 1.1 was released. If you still using Mypaint 1.0 , you might be interested to see what happened into this one year of change. For reading an excellent review about it , please read the very cool and full article wrote by Alexandre Prokoudine on Libre Graphic World , he also made a cool video.

      Here I will focus on writing a review for Mypaint 1.0 user, to let them know what changed and how they will benefit from it.


      On Canvas Notifications


      Now Mypaint is a bit more talkative when you press '+' or '-' on the keyboard to zoom with the 'Control+Space' shortcut. It was difficult back to Mypaint 1.0 days to have an idea of the actual zoom level. For the future development , this box system was made to be reusable ; so Mypaint might have better and better visual feedbacks on the next versions.
      The notifications are activated by defaults , and concern for the moment only the zoom level.
      To set them off or on : Menu > View > Feedbacks


      Symmetry mode


      An icon on the toolbar allow you to activate the symmetric painting mode. The axis displayed is a bold dotted orange line also part of the new  'on canvas ' feedbacks.  To display the axis or hide it : Menu > View > Feedback.

      The feature is very young and the axis is actually centered to the viewport, so take care if you zoom out or pan the canvas.


      Line Mode


      Mypaint 1.1 is now really able to do precise drawing, more technical, such as perspectives, or comics frames. This is not aimed to be a feature as flexible as in a vector programs (ex: Inkscape )  , but its now very capable to get the work done and having very cool results for your perspectives drawing, concept art of props , etc ...

      On the toolbar an icon will invite you to switch between various tracing mode , there is 4 : Freehand , Lines, Line Seq , Ellipse. Under them there is a graph , where you can tweak 4 points. Those 4 points represent a simulation of pressure ; input on left and output on right.


      On the screen under you can see how even more complex presets ( here watercolor_expressive from the set#2 ) are traced real time while you deform them. Also, you can see how the 'Line Pressure' parameters works when the input in low, and output is high.


      Each 'Line Mode' have it's own little secret of key combinations with Shift for extra features :

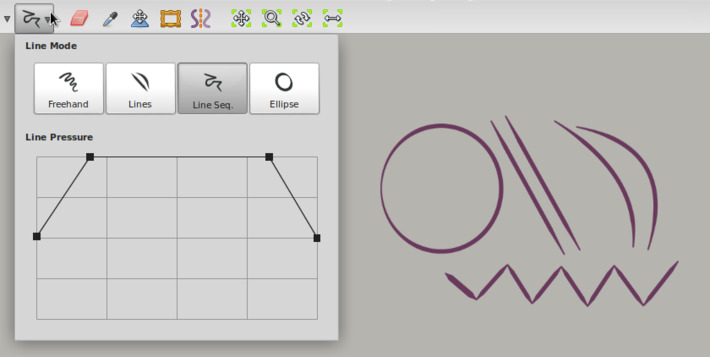
      Freehand mode + hold Shift
      A shortcut to do a straight lines, perfect to draw perspective grid

      Freehand mode + press then release shift
      A shortcut to do a straight lines , but constrained to every 15°, good if you need to draw square , rectangle ( framing thumbnails, drawing comics frame, or drawing the an horizontal horizon line on a perspective drawing. )


      Lines Mode and Lines Sequences : Create a lines , then drag and drop with Shift
      A shortcut to bend the lines interactively on the canvas as you can see on picture with red curve under representing various preset bend.

      Lines Mode or Ctrl while drawing
      A shortcut to do straight lines , but constrained to every 15°

      Ellipses
      + hold Shift during creation
      A shortcut to rotate the ellipse

      Ellipses + hold Ctrl during creation
      A shortcut to constrain ellipse to be a circle


      New layer blending modes

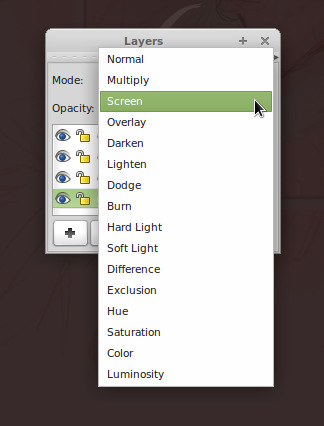
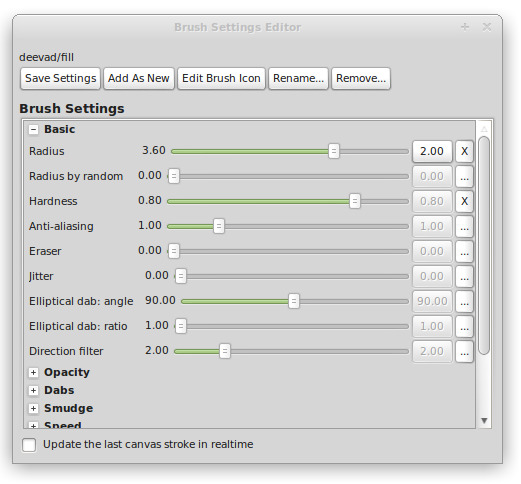
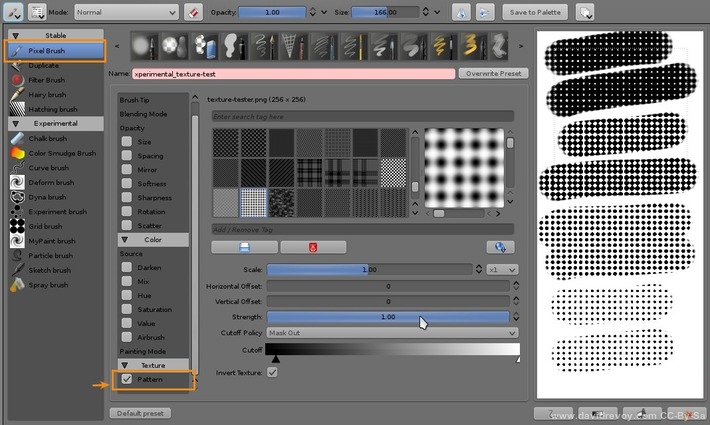
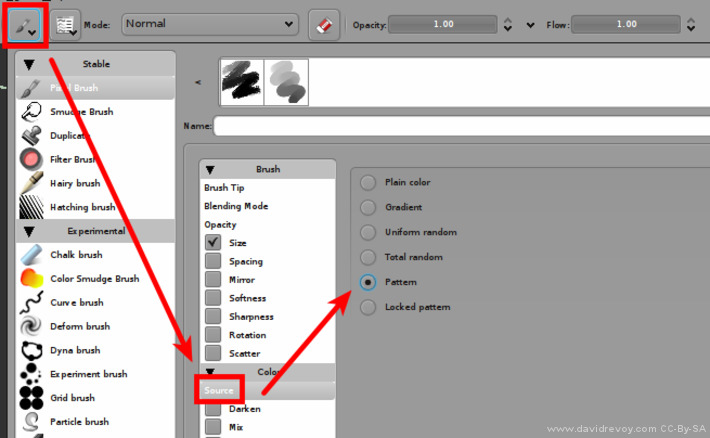
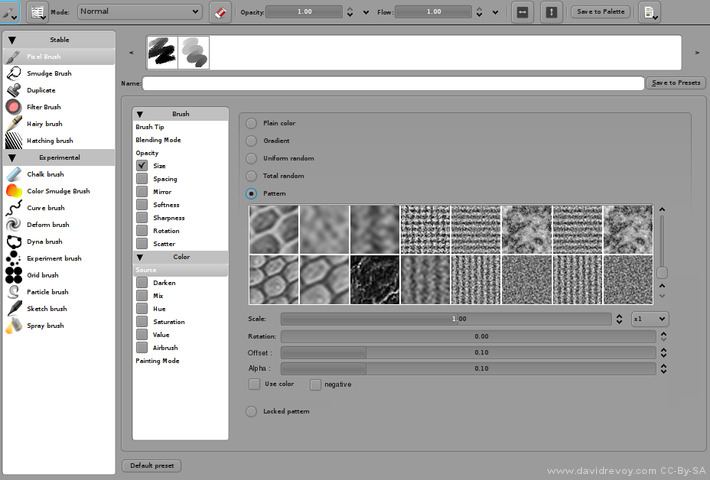
      One of the revolution in the precedent release were the addition of 4 layer blending modes. Now, the number of them grew to 16 and are compatible with Krita ( for Gimp, still take care of two particularity : they have a 'color' mode incompatible with Mypaint and Krita, and also have a 'overlay' mode broken , a duplicate of the 'soft light' , probably solved in series post 2.8 ).

      For Krita user, the Mypaint color blending equivalent mode can be found on Krita under the HSY > Color.


      Frame

      This feature solved the number one public enemy  bug report of all precedent version of Mypaint : the non ability to frame.
      Now Mypaint can still benefit of the infinite canvas feature, but you can set a frame on the top and resize. This framing zone will be the  only part exported if you save to PNG or JPG , the outside limit of the canvas will be saved if you use the Open Raster format, ORA .

      If you open a painting with Mypaint from another application , you may want to turn on the 'Enabled' frame ( I have a shortcut for this ). Your picture dimension will be locked. And Mypaint don't round to 64px everything as in 1.0 anymore.


      Convert to normal

      On the main menu, Layer > Convert to normal mode  is another innovation from the Mypaint developers ; it allows to 'bake' the pixels of a layer and render them as a normal blending mode. On the picture under, the textured 'soft light' channel was converted to a 'normal' layer blending mode with keeping the same aspect ( of course, picture loose flexibility , the layer bellow are less editable ).


      Change color (wash)


      On of the first on-canvas color chooser of old Mypaint, who disappeared on version 0.7 . I'm really happy to see it back in 1.1 ; I missed it.
      This color selector offer an explosive fractal flower of colors ; with variation of hue, saturation and lightness. It's intuitive and remind me the traditionnal palette.

      attribute it a shortcut by going over the item, and pressing a key :
      Mypaint Menu > Color > Change color ( wash )


      Gamut mask

      Masking the gamut is popular on traditional painting : and also happen frequently when your tubes of colors are empty , or when you limit yourself to use only some tubes of colors. Restricting the range of color , or masking the gamut , was also really well explained by a famous traditional painter James Gurney . I personnaly really learned a lot with his book : Color and Light.

      Mypaint 1.1 is the first digital painting application to support Gamut masking , in a digital fashion.

      Here under is a study with a split complimentary mask. I still need to train with it. I see a lot of potential in this feature especially to have interesting color palette and original renderings.


      You can set a lot of various mask , at 1 click away ( bottom right icon of the color palette ) , and move the shapes, etc... The user interface is really easy to learn.


      New color selector

      A new color selector replace the old one, and propose now :
      - a HCY Hue and Chroma :  All the color on the circle have the same lightness intensity ( Y ) nearest of human color perception.
      - a HSV  Hue and saturation : Linear and dependent of the RGB value and screen device, Blender user will be familiar with this one.
      - a palette , compatible with Gimp *.gpl palette files
      - a classic color triangle , HSV too. Thats the one I use the most ( I'm used to have same in Krita / Inkscape / Gimp ) , but I move slowly to the HCY Hue and Chroma
      - another HSV under the layout of a square , Photoshop user will be familiar with this one.  ( not you can also rotate the H, S, V in it )
      - last tab is for rulers

      Tips :
      - you can at any moment bookmark a color to the palette , icon in also on the bottom right
      - if you double click on the square of the actual color on the bottom , another color selector will open , where you can enter values, useful is you have to deal with webdesign/interface elements ( ex :  entering a grey #7B7B7B ) ,


      Color brush blending mode

      Brush blending modes where each dabs strokes affect the color bellow is a different feature than layer blending mode. Mainly because you can save the effect into a preset, and because the effect can get stronger as they are pilling on the canvas.

      Color blending mode ( HSY ) is one of the first.

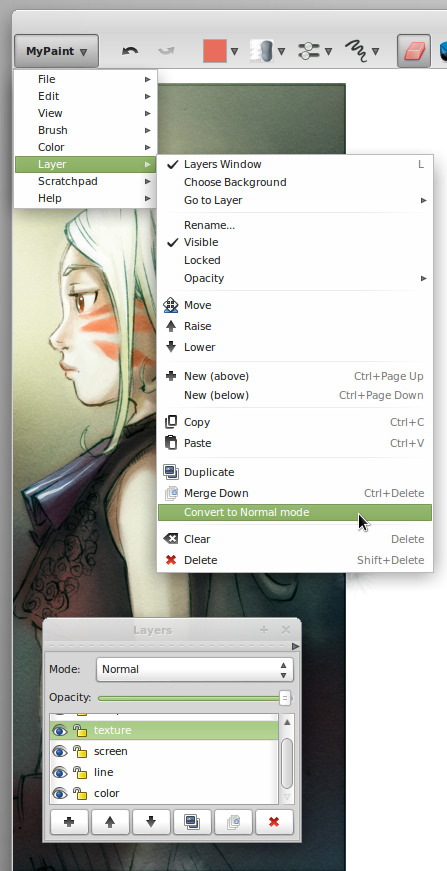
      Multiply blending mode for glazing will surely be on the way to the next releases , and I guess the 'layer>convert to normal' feature is already a first stone to allow painting with Brush blending modes even on a transparent layer.


      Preferences


      Now the Preferences panel can offer you the possibility to map a important number of action to special key ; as tablet and stylus button , or Shift, Ctrl ( named Primary ) , etc...


      Brush settings


      Brush settings is a panel you can call with pressing 'Control+B' or by going in the menu > Brush > Setting Windows.
      Nothing really changed on the appearence ( except the top tabs button, with labels now  ) , but the Brush preset of 1.1 are in a new format. Old preset are still compatible.

      My own kit of preset is the set #2.

      Tips : if you modify a brush size , opacity and want the change to be permanent ; open the settings, then press the 'save settings' button.


      Installation


      Mypaint official download page : http://mypaint.intilinux.com/?page_id=6

      Windows version is still not ready. A bug in one of the library make the tablet not working. Tumagonx is still alone on working on Windows portablity.

      Linux user will be able to compile the source code ( follow the README inside the source code archive ) , and distributions will certainly provide it via system updates in your package management of their next release.

      Ubuntu 's based Linux can use the easy PPA  of Andrew Chadwick : http://www.davidrevoy.com/?article85/mypaint-got-a-ppa


      Mypaint team

      A lot of effort, hours were done on this release  :
      - Martin Renold ( aka maxy ), creator and leader of the project.
      - Andrew Chadwick ( aka achadwick ) who made Gamut mask, frame feature,  color selector, notifications and many more.
      - Jon Nordby (aka jonnor ) who worked a lot on cleaning the brush engine, library , performances.
      - Richard Jones ( aka optigon ) who made all the Line modes.
      - and of course, all other contributors , translators, and testers.
      If you now cross this nicknames on IRC freenode channel #mypaint or on the forum , thanks them for the awesome work they do around this open-source software.

      They already started the road to 1.2.


      License of the article :
      Images and text on this article are licensed under a CC-By : Any usage of it ( copy paste / translating / commercial / publishing / derivations, etc ... )  are allowed if providing back the credit "by David Revoy" . Full license : http://creativecommons.org/licenses/by/3.0/

      ( PS : Well... that was long to write, now I blemish imagining doing the same thing for the release of Krita 2.6 ... oh my.... it will be long )


      Linux Mint 14 KDE for painters

      $
      0
      0

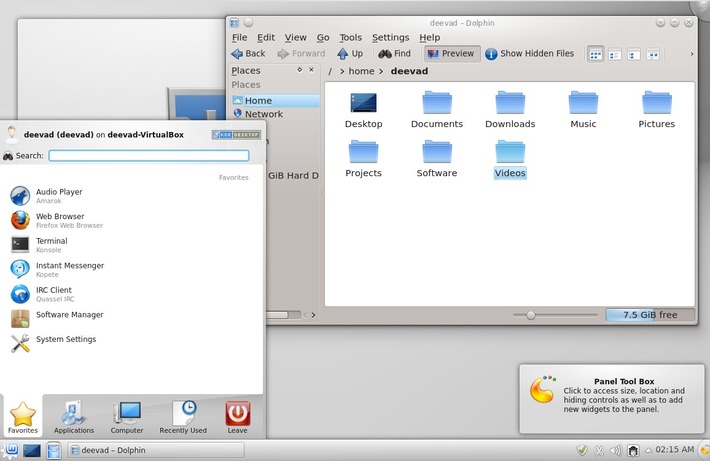
      New Year, new system install ; and (again) many new Linux distro tested ; Opensuse, Manjaro, Voyager, all 'buntus and all mints...
      I really liked OpenSuse 12.2 KDE, and Linux Mint 14 XFCE but my final choice is Linux Mint 14 KDE

      A big thanks to all developers and contributors around this system , I really like it. 


      About the system :

      Linux Mint 14 KDE is an interesting system for this reasons :

      • Default settings set by the Mint team makes KDE more user friendly
      • Access to all the Ubuntu 12.10 package and PPA
      • Codec and Flash installed by default
      • Recent component : KDE 4.9 and Linux 3.5
      • Large Linux Mint and Ubuntu community
      • And so, easy to find online "how-to" install for hardware


      Old paradigm, modern desktop , feels simple, fast, solid...


      GTK / KDE integration :

      I work with Krita , Kdenlive ( KDE ) but also Mypaint , Gimp ( GTK )  and it is rare to have a good looking theme across all applications. Linux Mint KDE 14 get it by default , and also propose advanced setup of GTK theming inside KDE.


      'GTK Configuration' panel in the System Settings


      Wacom tablet panel

      Wacom KDE services are installed by default. The user interface propose similar option as the Wacom official driver on Windows.


      Profile system : you can setup multiple profiles, and then use a icon in the task bar or a plasmoïd to switch fast between them


      Ability to map tablet and stylus buttons, and also attribute modifier as 'SHIFT''CTRL' etc...


      Ability to set the mapping on dual-screen, rotation, and calibration. Also an option to 'force proportions'


      Color-management

      Another good default is the presence of the color-management panel.


      From this panel you can calibrate, check your installed *.icc profile and link them with the hardware of your choice


      Performances

      Bad rumors still says KDE is heavy and a slow desktop environment. If you agree with that, maybe the information bellow will change your point of view :

      Linux Mint 14 KDE is fast, and lighter than main Ubuntu, even in RAM usage. Read this interresting performances comparison chart on Mylinuxexplore : "Ubuntu 12.10 Vs Kubuntu 12.10 Vs Xubuntu 12.10 Vs Lubuntu 12.10: A comparison"  ( note : assuming here Linux Mint KDE is pretty similar to Kubuntu )

      About 3D and display driver, it's possible to see how Kwin ( windows manager of KDE ) is behaving faster than others. Read this article of 6 pages on Phoronix : "Ubuntu Unity Proves Very Slow To KDE, GNOME, Xfce, LXDE"

      Also, controversed KDE services like Akonadi and Nepomuk are turned of by default.


      10 things To-Do after a clean install of Linux Mint KDE 14 :


      Here are my notes of 10 things to do after a clean install from the live-DVD.


      1) Setup the best server for packages

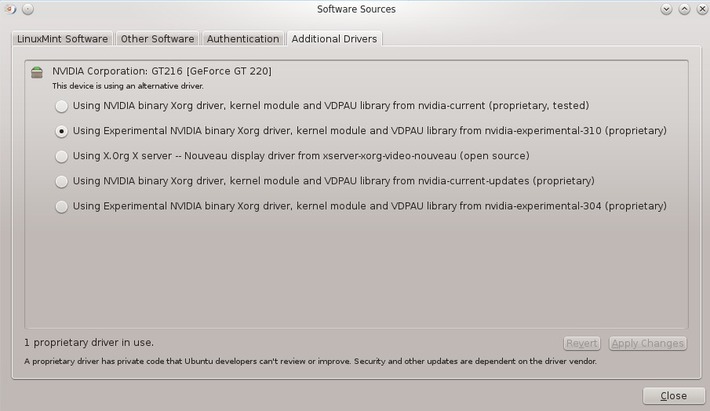
      This will boost the time of your system update ; Open your main menu, and in the search file enter 'Software Sources' then follow the picture number ( 1- first tab , 2- Download from 'Other' , 3- Select Best Server ). Linux Mint will find the best server.


      2) Update the system

      Click on the icon (1) to open the Update Manager , and click on 'Install Updates' (2) 

      Note : the install may hang in the middle to ask you to choose for a 'login' software : the choice will be between KDM and LIGHTDM , choose KDM, and click ok.


      3) Install proprietary driver

      Go back in the 'Software Sources' , it's on the 4th tab. I advice you to restart your system after a new display driver is installed.


      4) Rescue the 'Alt' Key

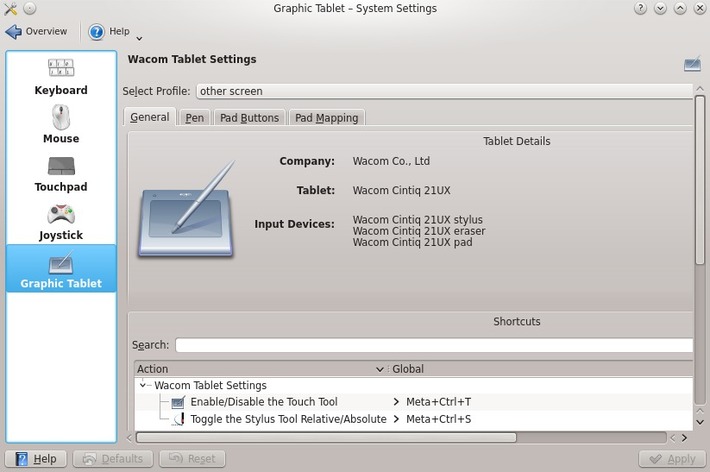
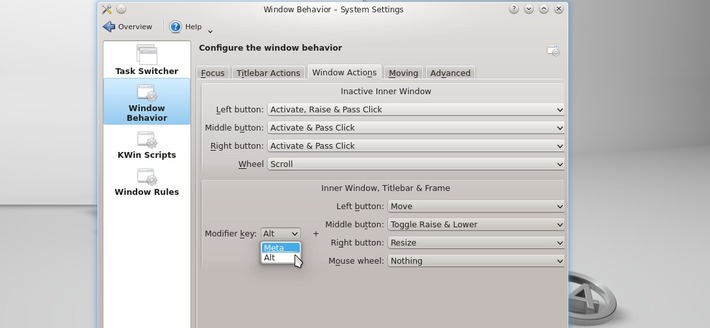
      One of the error of design of all Linux desktop environment is to use the 'Alt' key to drag windows. I remind 'Alt' key is usefull for many applications : Blender , Krita, Gimp ...etc... In the Settings > Windows behavior , you can attribute the drag behavior to the 'meta' key ( the 'Windows' key , less used )


      5) Remove hot-corner

      I dislike the 'hot corner' ( move your mouse to the top-left corners , all the windows will be minimized and displayed on your screen ). You can remove it in Settings > Desktop behavior


      6) Install applications

      Open the Software Manager , and then you can explore the software available ( thousands and thousands ) or do a search for the one you want. Here are the one I use : Konversation ( for IRC chat ) , FileZilla ( for FTP transfert ) , Shutter ( for screenshots ) , Inkscape ( for vectors ), Blender ( for 3D  ) , Kdenlive ( video editing ) , Kazaam ( video recording ) , Cheese ( play with webcam ) ...etc...

      For my digital painting tools : Mypaint and Krita , I compile them to have the last version and test features, report bugs ( read at the end of this article for more infos ) . Gimp is already installed. You can install Gmic via the Software Manager. 

      If you don't want unstable digital painting software ; install Krita 2.5 from this Software Manager , and for Mypaint 1.1 use the PPA .


      7) Enable the *.ora thumbnailer

      Having the thumbnails of the Open Raster ( *.ora ) images really helps. You can go to the 'Settings' in Dolphin the file browser, and activate the thumbnails. It also works for *.xcf, *.kra and other.  ( Note : on recent Calligra build , new field for 'Krita image' and 'Open raster' image are separated. )

      I also remove on Dolphin in the 'Behavior' tab the "Show Tooltip" , and in the "Previews" the "Directories".


      8) Setup oxygen-GTK for a better Mypaint toolbar

      Mypaint icon of the color selector are a bit too big with the default oxygen-GTK setup ; just go in the Setting > Appearance , and set the icon size of the toolbar to 16px to fix the issue.


      9) Add the paste-bin plasmoïd

      This widget is fantastic ; drag and drop a *.jpg picture on it, and it get automatically hosted on internet, and the link get pasted in your copy/paste memory. Very convenient to send picture link over IRC, or in bug reports. 

      To install it on your desktop, just click a 'cashew' (1) and then click on the button to 'add widget' ( not on the screenshot ) , the widget bar will appear, and you can slide it to find the pastebin widget and drag and drop it on your desktop.


      10) Add a shortcut to the activities

      KDE desktop have a cool feature named 'activities' ;  you can have the activities switcher by doing the same than for having the previous 'paste-bin' , but just drag and drop it at the end on your panel.


      For testers or technology enthusiast : script to compile Mypaint,  Krita last code


      I decided to write for myself a set of bash script to automatize the task I repeat often :

      • Doing a first install with dependencies
      • Update the source and compile
      • Compile
      • Reset to Master
      • Reset to last stable

      Script are made for :

      - Mypaint 1.1+Git
      - Krita 2.7Pre-Alpha
      - Vc ( a library to boost performances of Krita )


      Download :

      The 3 scripts can be downloaded here : deevad-installers.tar.gz
      Note :  the script provided here were tested and written for Linux Mint 14 KDE edition


      Usage :

      Download, Extract, Open a terminal , and execute them.
      All will be installed in ~/Software/<software-name>
      I advice to install Mypaint first, then VC , then Krita ; and reboot.
      It's very easy to use, follow the instructions.


      Changelog :

      [2013-01-09]
      * updated webpage link
      * krita-install.sh  now remove all pre-installed calligra libraries on Mint 14


      krita-install.sh script on Konsole
      ( note :  I have a two menus shortcuts to launch directly the scripts )


      Krita 2.7 Pre-alpha compiled with the script ; with new features : Line smoothing and Flipbook  


      Mypaint 1.1+Git compiled with the script


      Krita Brushkit V2

      $
      0
      0

      Brushkit V2 in Krita dev version ( 2.7pre-alpha 14-01-2013 )
      (click to enlarge)


      zoom on Krita preset docker with brushkit V2


      [ This article is an update of the old V1 preset for Krita , published in June, 2012 ]


      I like to take care of my brush preset.
      As a proverb in France say ; "Un bon artisan prends soin de ses outils" ( can be roughly translated by "a good worker take care of his tools" ).

      So, here is the new pack of my presets ( reworked, cleaned links, cleaned dependencies , new icons ! ... what a work ... ) compatible with the upcoming Krita 2.6 and the dev version of course.


      Content of the brushkit

      Example based on picture, scrap, sketches,test found on my disk.
      I pasted on the top the brush used to give you an idea of the rendering.


      My inking, sketching and filling tools


      A smudgy preset mixing nicely color with a sort of bristle simulation


      My speedpainting tools : dry and textured, layering value in opacity


      A mix of preset ; a dulling brush with soft bristles, splatters textures and experimental brush.


      Wet techniques : using preset based on the mixbrush engine


      Various demo of 'ready-made' pattern : clouds, grass, herbs ... I tend to less and less use this type of brush.


      Experimental brush, splatters and airbrush


      A sample preview of the smearing/smudging presets  : Various textures


      Miscellaneous presets : A tubular pen for drawing with geometric shapes,
      A clone brush tool preset ready to use, and a airbrush in dodge blending mode, for speed highlights and Fx


      My preset don't use all 'brush-engines' proposed by Krita, only the one useful for my workflow and own preference.

      Download :

      V2 for Krita 2.6 and later ( may work in 2.5 ... not tested )  :
      2013-01-14_deevad-kit-Krita_v2.tar.gz  4.3MB


      Older versions :

      V1 for Krita 2.5, 2.4 and 2.3


      Install :

      The tar.gz ( to download ) contain 2 folders :
      brush and paintoppreset
      you have the same preference folder on Krita ( on Linux :  ~/.kde/share/apps/krita )
      So, just extract them , to make brush in brush and paintoppreset in paintoppreset as in the picture bellow :


        folder view : click to enlarge

      Uninstall notes : Brush have deevad_* as filename prefix , you can easily identify them in your folders and erase them manually.

      License:

      This brush , icons and presets are released CC-0 / public domain

      Images and text in this article are CC-By-Sa
      "www.davidrevoy.com "

      Textured brush in FLOSS digital-painting

      $
      0
      0

      This article is a personal research document done around the 'textured brushes feature'  in digital painting.

      This article start with an update on my investigations , addressed to Krita development .
      Then you can read the original article published on 11 december 2011.

      Update  :

      This update add informations to the chapter 'How I guess it works'.
      I obviously didn't studied it enough, or missed informations on the first publishing. I hope this update will correct it. 


      The update is based on what Krita is able now , on Git master 2.7pre-alpha, and I hope it will help the leader of the Krita project and chairman of the Krita foundation Boudewijn Rempt ( aka boud on IRC , #krita channel , freenode ) to polish the feature he started just right after the publishing of the first version of this article ( thanks again about it ).

      Note : the 'textured brushes feature' is available since 2.5 and still sleep because -I guess- the result is not what user expect.

      Note 2 : Link to the same bug-report page : https://bugs.kde.org/show_bug.cgi?id=313831


      The 'textured brushes feature' in Krita since 2.5
      ( Pixel brush Engine > Pattern )


      One of the rare speed-painting tested with tweaking the feature in Krita 2.5
      All feeling of 'dynamics' here are simulated by moving the parameters manually


      A better test file

      I worked on having a better test file this time (  attached to the bug-report ) than my previous poor binary black and white 'checker'.

       It helped me to figure-out how the actual parameters works on Git master 2.7pre-alpha. The 'Texture-tester.png' pattern in the tar.gz contain blured dots , from 0 to 100% value.

       I also drew a 3D representation under to understand later the 'Cutoff' parameter in a visual way.


      Finding the right setting to attribute a pressure dynamics


       The target is to give to the user the feeling of having a tool who affect the grain of a texture. For reference , I did test "to the root" and took a photo of 3 traditional art tools and the way they react to a paper texture here.

       So , doing high pressure on the stylus should give the feeling to crush all the texture and deposit a lot of 'pigment' on the canvas ( and so affect all the brighter value on our test-texture ) .
      In opposite , the lower pressure should only affect the peaks ( dots in black our test-texture ) to give the user the feeling to only touch delicately the texture, and deposit 'pigment' only on the micro summits of it.


       Fortunately , the feature exist at 90% I would say in actual Krita . Thanks to my better texture to test , I could find the best parameters to mimic this process.
      • the mode is "Mask Out"
      • check-box "inverted" is checked
      • moving manually the little 'black' pyramid slider from right to left to select the value range to affect.
      Conclusion :
       If this value/data could be linked to a pressure dynamic, I presume the 'textured stroke' feature would work.


      -------------------------------------------------------------------------
      -------------------------------------------------------------------------

      Article previously published

      The following article was posted on the 11 december 2011.


      Visual infos

      As a picture worth thousands words, this article is mainly done around visual exemple done this way :
      - Pattern sample : a little zone to display the pattern selected as a texture
      - Brush mask sample : the brush selected ( brushes belong to the brush kit GPS 1.5 )
      - Test stroke : 2 areas to see how the texture behaves on various backgrounds
      - Painting test area : A speed painting example to show the rendering quality potential of this brushes

      Traditionnal simulation

      Oil dry
      A paper like texture pattern combined with this sort of brush can obtain a very expressive effect. The strokes get more life and tell more about the energy of the painter. We are also used to decrypt this sort of rendering with centuries of traditionnal painting imagery. On low pressure some hair rubs the canvas to reveal his texture , while on high pressure , the mix brush engine create a more consistent color, near to an impasto. 

      Pastel
      A pastel preset would use a continuous fiber-pressed paper like paper Ingres simulated by this kind of pattern, and a squary brush mask to simulate the foot print of a pastel block. Mix brush engine is inactivated to have a more dry technic result. If I would activate it, I would obtain a sort of crayon/oiled chalk/oiled pastel effect. 

      Speedpainting texturing

      Reptilian sort of skin

      Reptilian sort of skin ( negative )
      Speedpainters can takes a lot advantage to have efficient patterns : most shading part of the artworks can benefit in less than a minute to a big amount of details with only few brush strokes. Leather, trunks, scales, roof, bricks etc...etc... can be simulated this way.  For this example above, I show also the same texture can produce another effect with itself negative.  

      Cracks on a surfaces
      Most textures shouldn't be left 'as this' on the canvas, and need further little painting details to make them believable. Apart of that the textured brush does a wonderful job to got a prototype of the visual aspect before a final refinement. 

      For 3D artist

      A texture applied to a cube in Blender
      Digital painters are not alone to benefit about textured brush strokes. 3D texture artist use them a lot. A large library of good tile-able patterns is a must have for them.On the example above here is a 1min textures done with a pattern and 2 brushes ( a cloudy one for texture variation , and a rake for scratches on the borders ) and applied to a cube in Blender.

      How I guess it works

      technical test with rounded brush and checker
      I'm not a coder and technician, but I do an attempt here to describe the behavior to help user and developers to understand it. The pattern seams to react just as a 'alpha mask' acting in addition to the 'brush mask'. It's evident with testing the feature with a circle as a brush mask and a pure checkers as a pattern. Black parts become totally transparent while white totally let express the original brush behavior ( a opacity control on the pressure )

      Pattern alignment test
      Threw many strokes done, the pattern position keeps aligned. This is good, because it allows to brighten parts or darken parts of a textures, and be consistent in a shading. Also, with this behavior, the usage of pattern as textured paper is possible and keep consistent.


      Graphic user interface

      The texturing as you can use it now in Gimp-painter 2.6 

      The current GUI in Gimp-painter works, but don't offer many options. A checkbox 'Use texture' ( only available in mixbrush ) activate the feature. A slider 'Grain' under offer the possibility to have an additional alpha control on the pattern. Good to 'calm down' a to strong texture effect. The pattern choice depend of the Gimp internal panel for pattern selection. The preview are really bad, because they offer a little square centered cropped at 100% resolution. For artist working at high resolution for printing, the maximum of 512x512px for pattern size is a hard limitation, and the thumbnail often end up in a cloudy zoom on the texture, not representative at all, and so hard to pick. A good spatial memory ordering helps. 
      Other majors disadvantages ; the scaling of the texture is not possible to choose on the fly. For this you have to resize your pattern manually and create as many instance of the same pattern at each size you want. Same for a simple negative. Also, default provided patterns needs to be deleted, they all are useless. 

      Gimp-painter 2.7.2  textures on GUI  new toolbar ( abandonned developement )

      The toolbar access to the texture as proposed in the version 2.7.2 of Gimp-painter was a brillant idea from the developer of the fork Sigetch. But it seams the main part of Gimp team not agree with him according to the actual 2.7 development ... 

      Krita 2.4 beta  Pattern on GUI  toolbar
      Krita also propose the same very good access to the pattern via the toolbar, with sharing of ressources via GHNS ( to share or download online patterns on the fly from within Krita ) , organisation via Tag. As a cons, the panel is not undockable nor re-sizable, the preview thumbnails are also fixed size and not offer a good visibility for high res textures.  

      Krita 2.4 beta  Actual textures feature
      The actual 'Source->Pattern' features is not usable as a textured brush. The alignment is good, but the texture pattern don't behave yet as an alpha mask , but as the 'source' color of the brush strokes.

      A visualization mock-up of a functional GUI for textured brush in Krita 

      This 'ideal' mock-up feature:
      - a selection of the pattern ( thumbnails ) , because preset should ideally remember the associated pattern if in use.
      - a 'Scale' silder , to upscale the texture or downscale it according to the need of  the artwork. 
      - a 'Rotation' slider ( optional ) , to rotate the texture panel ; if impossible to do , simple mirroring on X or Y axis is also interresting
      - an 'Offset' slider (optional ), to offset the alignment position of the texture on both X and Y axis.
      - an 'Alpha' slider , to do as Gimp-painter propose , an additionnal alpha control on the texture itself. 
      - a checkbox 'Use color' ; to fall back on the actual 2.4 behavior where texture use color input
      - a checkbox 'Negative' ( optional ) , to use an inverted version of the pattern too. 

      I made it to simply to communicate how it can looks, sorry if it's a non-sens coding wise. This is just a user proposition

      Ending note :

      I hope my article will help developers to make future FLOSS digital painting tools better. 

      Ressources :  materials to do your test ( patterns I use in this article , 3D files , template for my test zone ) textured-brush-floss.zip  ( Public domain textures, CC-0 ).

      If you have additional thinking or question about feel free to use the comments. 

      Texture pack 1

      $
      0
      0

      Since few days, there is a lot of activity around the 'textured' brush feature started by and continued lastly by
      bug-tracker topic about it


      2013-01-26_Krita_texture-pack1.tar.gz 


      • 2 canvas  ( thin , and rough )
      • 4 papers ( default, C , torchon )
      • hand drawn pattern ( dot , hatching )
      • textures ( rocks, bark, wood, crackles )
      • 3 dynamic screentones


      I followed this specifications :

      • 512x512 max with a lot of details
      • Pixels infos from black to white, normalised with most of 50% mid-grey value
      • Seamless , tilable to infinity of course ( thanks Gimp Resynthesizer plugin )
      • Removed duplicate : my original set contained more than 50. Similar effect or neighbours were removed.
      • *.png compressed, easy to manage on file explorer , with thumbnails and cross compatible. 
      • prefix of filename 'deevad_' for organisation, and easy removal if needed.


      various sample of stroke effects

      texture test : water-dragons cooking, and Snow

      $
      0
      0

      click on the picture to enlarge ( more infos )


      click on the picture to enlarge ( more infos)
      some of my last test with the new 'texture' feature of Krita , posted on my deviantArt account.

      Quick Tip 1 : Krita user interface, working with values

      $
      0
      0


      For black and white artworks or when you need to spend long time working on the values in your process , you 'll probably appreciate this ...


      Specific Color Selector

      - Add the docker 'Specific Color Selector'  ( Top menu : Settings > Docker > Specific Color Selector )
      - Check the box 'Show Colorspace Selector'
      - Turn the model to 'Grayscale'
      - Uncheck the 'Show Colorspace Selector'
      - Resize the box to have a long width
      ... Now you have a wider range of selection for selecting precisely a value

      Light pollution around

      - To dim down all the polluting back-light of your display around artwork and help you to focus on your artwork, a good idea to change Krita for a darker theme.
      Top menu : Setting > Theme >  ...then choose.
      I tend to work more in the 'Krita-blender' theme, or as on the screenshot above  'Krita-darker'
      Note : Gnome / Xfce / Unity users may have a bad rendering. Install kde-style-oxygen package , and setup it with qt4-qtconfig to solve

      - Also, you can dim the value of the color 'around the canvas' in Krita
      Top menu : Settings > Configure Krita -> ( display icon on the left column ) -> Canvas border :  'Color'
      Depending the mood, I use or a dark value here ( 50 ) or a mid one ( 128 ) , but rarely above

      Keyboard shortcut

      You can press at any moment while painting this two mnemonic shortcuts
      K for 10% darKer value
      L for 10% Lighter value
      Also, as a reminder : I for less opacIty,  and O for more Opaque are just above , and M for Mirroring view ...

      Save your workspace

      Krita can save 'workspace'  witch mean you can save mukltiple dockers positions depending your activities, or workflow
      Toolbar : Last icon -> Insert a name -> Save
      ex : here I have my trusty 'Black-White_1200x1600' workspace ready to launch for my screen.

      Design ideas for Krita perspective tool

      $
      0
      0


      Here is another article to propose ideas on how to improve perspective tool.
      As usual, only mockup and ideas here. No codes.

      I made it because I felt driven by the sincere desire to propose a cool design.
      Solving problems on user side and designing an ultimate feature was a fun brainstorm for me.

      1 - Initializations

      The user select the perspective tool in the toolbar , then click four point on the canvas around a rectangular ( can be irregular ) area. This define the world limit.


      2 - The widget proposed


      Just after releasing the 4rth click, Krita change the area for the default perspective widget.
      Three colored dot stand outside the area frame and can be moved around , one by one . They influence the grid lines inside the area ( as vanishing points does ). Red and Green ( X and Y ) dots are linked by a black line : the horizon line


      3- Adapting by removing


      On this comic frame sketched , no need of a third vanishing point. By clicking the red cross next the blue dot  , the dot is removed. Krita then propose verticals blue lines ( two vanishing point mode ).


      4 - Adapting perspective grid


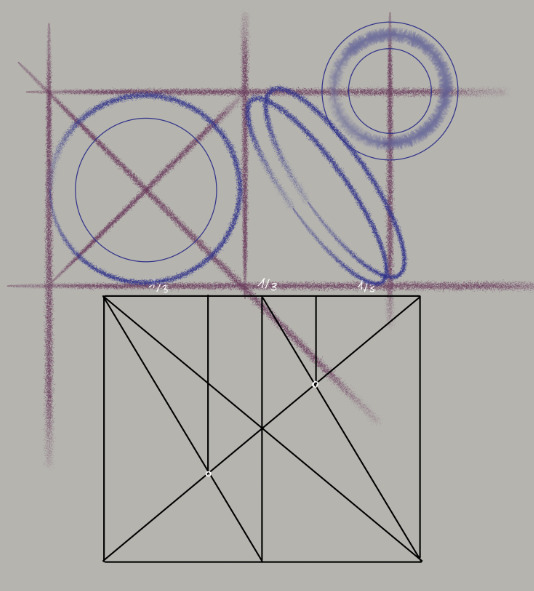
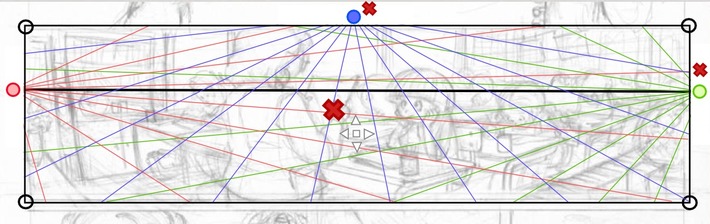
      Luckily, horizon line is placed at 1/3 up by default , similar than on my sketch.
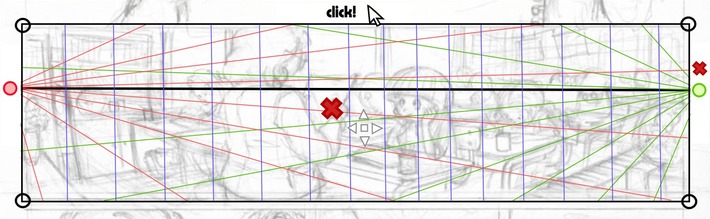
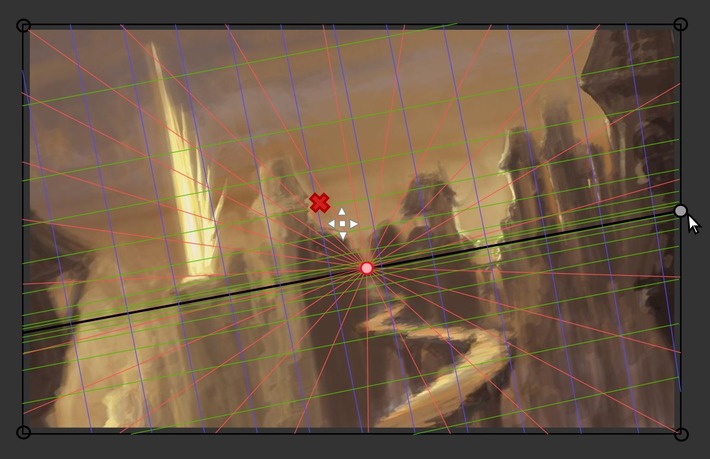
      I just need to drag&drop the red dot a bit outside the canvas to adapt my red perspective grid lines to fit my sketch scene. While I'm dragging the red dot around, all the red line inside the area keeps changing to target the point I'm moving. I can see the change in live.

      Not a lot of click or menu , work done !  :-)


      5 - Possible customization

       'Tool option panel' can propose extra customizations :

      - Various color scheme for the 3 axis ( default X Red , Y Green , Z Blue as in Blender 3D, additional can be all black or other color alliance ;   pink / violet / teel ,  yellow / green / orange ...etc...  On the mockup I drew the color square, but a textual list of preset name can be sufficient )
      - Line width of the grid and opacity ( if the user works at various resolution )
      - A grid density  defining the amount of subdivision of the minimum amount of rays.
      - A button to 'Bake' the lines into a new pixel layer : useful to save lines for a ORA or PSD export or to do a Transform warp on a baked perspective to bend lines , or for user who prefer to turn visibility of the perspective using layers.


      6 - Ready to draw


      Here is a mockup after user increased density and switched to the freehand painting tool to start detailing on a solid perspective grid.
      The widget disappear, only the colored 3 axis grid remain.

      He can then activate 'Assistant' on the tool option and draw with a magnetic way on the 3 proposed axis.
      ( ex: to ink his background , objects )

      Also the grid gives sensors information to the input dynamics 'Perspective' in the brush editor. User can decide then to map pressure or brush size to follow a variation according the perspective.


      7 - Other usage case : distant vanishing point

      Area 'world limit' are designed to let comic/manga artists to setup multiple perspective area on a single document opened.
      Zooming out the canvas can help to place distant vanishing point outside the canvas , on the borders.


      8 - Other usage case : single vanishing point, tilted horizon line

      If you remove the Green and Blue dots ( you can't remove the Red by design ), you fall into the single vanishing point mode ( the two other axis are then perpendicular ).

      Note : to solve a special use case 'Tilting the horizon line on a single vanishing point perspective' a new gray dot appear on the horizon line ( or take the place of the old Green Y one ) and let user tilt this line.


      Conclusion

      I studied many 'perspective feature' on other 2D softwares and studied videos tutorials to produce this article.
      I hope this document will inspire or help ( or even only influence a bit ) the development of a solid perspective tool.

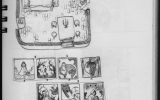
      To finish , I propose you to have a look at this making of pictures ( under ) I did on November 2012, just to inform : It's 4 years ( since I'm using FOSS only )  I'm doing my perspective system manually with a simple line tool ( before I was addict to my Manga Studio Ex 3 license ) , and all in all, it's also OK do it this way ...   Just longer, less flexible ...etc...

      I'm not in a hurry about having a new shiny tool  , and I'll even continue to draw a lot of new environment without it


      ... and the final image here


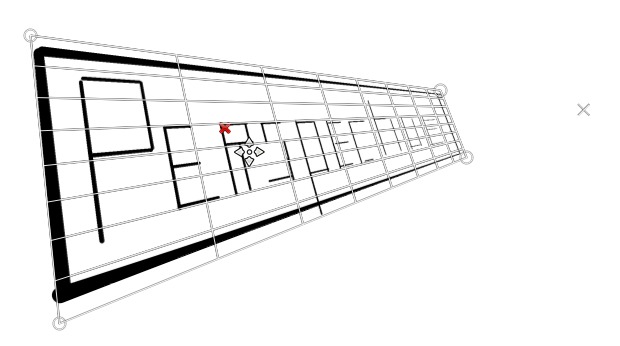
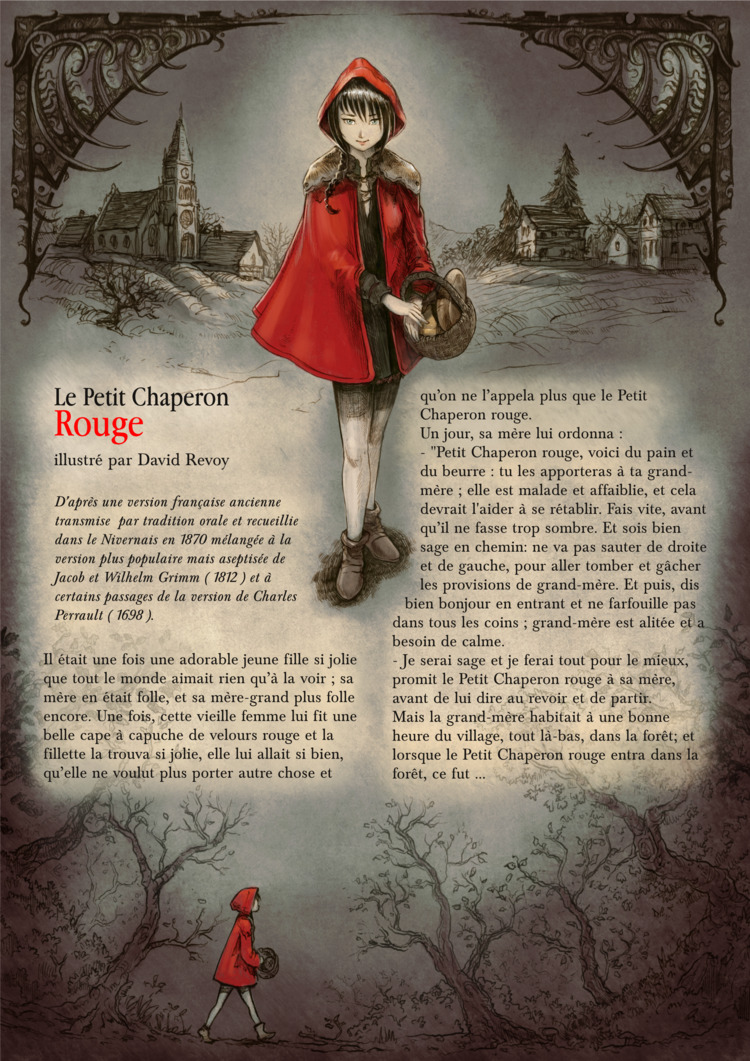
      Note : Screenshots in this article are mockup done with Inkscape. The comic page used is a old test page of my graphic novel project L'héritage en couleur.


      Gimp 2.8.4 Ppa

      $
      0
      0


      Gimp 2.8.4 was released yesterday, with bug fixes to polish the 2.8 family. 
      I particularly like the new fixes for this version, because it solve a strong problem introduced in the 2.8 serie ; slow and laggy selection tools and transformation widget , brush outline.
      I was active on the Gimp bug report to give feedback and thanks to the brilliant Gimp developers the problem was solved just after few days. With this version, all is much more responsive. The fix slept since this autumn waiting the release, and now released.

      Here is how to update your version using the updated PPa of otto06217 :

      PPA for Ubuntu 12.04 / 12.10, Linux Mint 13 or 14 :


      Open a terminal , and copy paste this lines one by one, then press enter. Press ok or enter if the terminal prompt you.
      Note : Ctrl+Shift+V to paste inside a terminal.

      sudo add-apt-repository ppa:otto-kesselgulasch/gimp
      sudo apt-get update
      sudo apt-get install gimp gimp-plugin-registry gmic
       

      Le Petit Chaperon Rouge

      $
      0
      0


      A personnal project of illustrating an early version of the Little Red Riding Hood , told by French peasants since the 10th century, featuring cannibalism, blood, nudity and vulgar words ... A surprising version.
      So
      I decided to sample this old oral tradition version named commonly 'version of the Nivernais'  with modernised version from Jacob and Wilhelm Grimm ( 1812 ) and Charles Perrault ( 1698 ).

      To quote english Wikipedia page about older versions :  "The wolf usually leaves the grandmother’s blood and meat for the girl to eat, who then unwittingly cannibalizes her own grandmother. Furthermore, the wolf was also known to ask her to remove her clothing and toss it into the fire. In some versions, the wolf eats the girl after she gets into bed with him, and the story ends there."


      My raw text adaptation , in french,  can be found here chaperon-rouge.html ; my english skill is too low to translate it alone ;  so I'm open to translation proposition. If you are curious about the story, 'google translate' the page .

      About the making of it ; my challenge during last christmass holidays was to get done a project 'unplugged' : with only a ballpen and a sketchbook ,  to take holliday far from computer. It was really pleasant. Digital coloring and painting were done later in Krita as well as text in Scribus on Linux Mint KDE 14.


      Fisher

      Artscriptk 0.8.7

      $
      0
      0

      Video of ArtscriptTK in action , done by Iván Yossi ( aka Ghevan ) on his Youtube channel.


      Update 4 March 2013


      Artscriptk is a GUI wrapper for convert ( Imagemagick ) and calligraconverter ( Calligra suite, Krita ) written by Iván Yossi ( aka Ghevan ).

      In simple ; it allow you to convert , from a selection+right-click on FileManager , one or multiple (batch )  multilayered XCF, ORA, PSD , KRA file to JPG or PNG with a nice watermark option, adding prefix or not, resizing too , etc...  Ideal to send to a client a JPG file low res of your precious hi-res open-raster multilayered file , or publish an artwork on a forum. Just at one click away.

       It was inspired by my crappy old version named Artscript ( watch the video in the last part of this page if you want to understand the start point ), more infos in the video above, or directly read the official release page of Ghevan : http://colorathis.wordpress.com/2013/02/08/artscriptk-v0-8-6/

      Ghevan did a absolutely wonderfull work on it. The script use now a single graphic user interface, better result and performances, easier to install. I tested it the last weeks and he was really nice to correct and polish all the bug I could found on it.
      I use the 0.8.7 version on my Linux Mint KDE 14 Dolphin, and all run perfectly. A must have for all graphist on Linux. Thanks again !

      Installation

      On XFCE :
      You may want to directly refer to Ghevan page , http://colorathis.wordpress.com/2013/02/08/artscriptk-v0-8-6/

      On KDE , for Dolphin :
      Be sure to have Imagemagick and Krita installed for the required library.
      Download the tar.gz here  : http://opendesktop.org/content/show.php?content=157214
      Extract it in  ~/.kde/share/kde4/services/ServiceMenus/
      ( it can also start by ~/.kde4 , if it's the case, you'll have to edit the service file *.desktop to update the path manually to the script )

      To see if it worked :  Close all Dolphin, then restart Dolphin. Select one or more image files in Dolphin , right-click then select in the menu the new entry 'Artscript'. This will launch Artscript GUI. Do your choice, then apply. Done

      Note : if you want to edit the presets, write this in a terminal :
      kate ~/.kde/share/kde4/services/ServiceMenus/artscript.tcl
      Then edit from l.47 to l.68 with your watermark preset and sizes, suffix...etc...

      Doesn't work ? What to do :
      - Check if you have the *.desktop file inside ~/.kde/share/kde4/services/ServiceMenus/
      - Check the permission to execute of the file artscript.tcl in the same folder
      - Check if you have the library installed : Imagemagick, Krita
      - Try to restart Dolphin
      - all this failed ? maybe it can broke with time, try newest version on Git-hub repository : https://github.com/vanyossi/artscriptk

      On other file explorer ( Nautilus, Nemo, etc... )  :
      No solution for the moment, but If you have a preference to add custom script , just add artscript.tcl followed by the way to open mutiple file with path. For ex: artscript.tcl %F   or equivalent, all who can look like this output : artscript.tcl /path/to/file1.jpg /path/to/file2.jpg /path/to/etc.jpg


      More links

      links for more documentation : http://colorathis.wordpress.com/2013/02/08/artscriptk-v0-8-6/
      Git-hub repository : https://github.com/vanyossi/artscriptk

      Old article for archives

      The content framed here is outdated , it was first published the 18 december 2012 , I recommend now to use the ArtscriptK version of Ghevan.


       I started to play with 'bash' script on my freetime, and I just want today to share my  humble scripts packed.  Yes, I'm proud of my first 'release' , and you can probably feel it in this little video above.  My goal : bring to artist users a series of handy KDE's services script, for boosting productivity task. I made them for my freelance usage along the time.  The video show the features and usage, I hope you'll like them.

      Details of scripts in the package :

      Note : input files compatible : *.xcf , *.ora , *.kra, *.psd , *.tiff, *.png , *.jpg , etc...

      ToWeb :
          export selected files to jpg, with customisable compression, size, watermark
          --> for exporting preview for your client, or final resized piece for your post on web, emails, etc...

      ToOra :
          Convert selected files to open-raster layered file format, as opened by Krita, and saved as *.ora
          --> for converting old *.psd or *.xcf project you want to retouch with Krita or Gimp.

      ToPng :
          Convert selected files to flat png, compressed well.
          --> Ideal for lossless flat archiving, or transmit flat RGB Hi-res

      Date :
          Add the prefix date with the ISO pattern : YYYY-MM-DD_yourfile.ext , work on folder, multiple files, etc...
          --> Ideal to keep your folder and artwork version , sorted by filename = sorted by creation time.

      Collage :

          Do a collage of the selected files into a unique jpg image at 92% compression, tiling customisable
          --> Ideal to compare 2 artworks, export a Work in Progress.


      Dependencies :

      kdialog : for the GUI windows
      xcftools: for the XCF reading compatibility
      calligraconverter: for the KRA, ORA compatibility
      imagemagick : The main library for the rest, and manipulations ( resizing, collage )

      on Kubuntu :
      sudo apt-get install xcftools krita imagemagick-common

      Download :

      2012-12-18_artscript-v1.tar.gz  ( 60KB )

      Disclaimer :
      Use them it at your own risk.

      How to install :

      • tested on Kubuntu 12.04 and Linux Mint KDE 13 :
      • Download and Extract the artscript-v1.tar.gz
      • Copy the share folder into your ~/.kde folder
      • Go to the folder ~/.kde/share/kde4/services/ServiceMenus/artscript
      • And check if all the script are exectuable ( right click, permission tab, is exetable )
      • Note: Edit with a text editor ( Kate ) 'toweb' , you can customise the watermark preset, and suffix on the script, l.80 and l.138
      • Done

      Future :

      You enjoy ? you want to developp it ? continue it ? adapt it for Nautilus script, Nemo script , or Thunar Action, or wathever DE ?
      Fine ! here I'm a bit limited by my poor skill, so it's up to you if you know how to put it on GIT, bring features, make better default , etc... I'll be happy to test, and be around.

      Licence :

        www.davidrevoy.com , info@davidrevoy.com  GPL 3.0
        some of the icons are derivative of the Tango icon project
        and Faenza under compatible license. 

      Heroes from the Past: Joan of Arc, Green Sauce Games

      $
      0
      0


      Heroes from the Past: Joan of Arc is a puzzles/match 3 game produced by Green Sauce Games.

      My work in this project was mainly to produce some of the games backgrounds for levels ( night and day version )  , startup screens ( Joan with the flag ) and a cinematic with still picture as a game intro.  The game contain epic landscapes with high colors and details, castles and waterfalls with various ambiants.

      I used the same technic as I did on the previous video game with the team :
      Dreams of a Geisha ( blog post with makingof step ).  A lot of other Gfx you can see on the video ( as the village construction, icons , Fx and game GUI ) were done by other talentuous artists.  You can find their name in the credit of the game or by contacting Green Sauce Games .

       The game is actually
      ready to download on Big Fish here for Windows XP/Windows Vista/Windows 7/Windows  and Mac.
      The Big Fish page also contain another video presentation with other artworks.

      Note :  it's a real pleasure to see it ranked number 1  on BigFish.
      Congrats to the
      Green Sauce Games team for the success !


      Viewing all 525 articles
      Browse latest View live